The bridge is your supporting hand, set on the cloth (or on the rail): it carries the shaft of the cue and dictates its path. It is the part you look at least, and yet it decides a lot: where the tip reaches the ball, at what height, and whether the cue goes out straight or crooked. This page treats it as a subject in its own right: the distance to the ball, the height, the role of the thumb, and above all what to do when the ball is at the edge of the table.
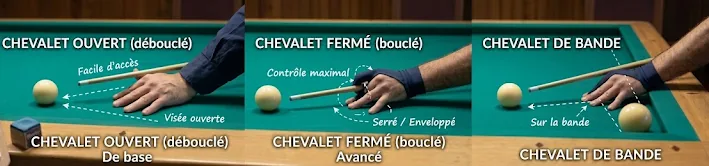
The basic shapes are already covered in Basic technique (“Guiding the cue”). Here we go further: why choose a given shape, how to switch from one to another without the hand moving, and what to do when there is no room left to put the hand down behind the ball.
Three jobs for one hand
What the bridge must do
What it takes
How to check
Guide
The shaft can only travel along the line of your aim.
Lay the cue in your bridge without shooting and look where the tip points: on the line you chose, or beside it?
Set the height
The height of the guide fixes the height at which the tip meets the ball.
Compare what you want (high, center, low) with the height of the tip, seen from the side.
Stay still
The hand does not move: not before, not during, not just after contact.
Play five soft shots, seen from the side or filmed: if the little finger or the palm lifts off the cloth, the bridge has moved.
The glide test. Before you shoot, take two or three practice strokes with the cue in your bridge. The shaft must glide without catching, without side play, and without the hand moving a millimeter. If it catches, you are squeezing; if it wobbles, you are leaving too much play.
Distance: lengthening the bridge
Between your hand and the ball there is a length of free shaft. It sets both your accuracy and your swing: the shorter it is, the closer to the tip the cue is guided, but the less room you have to take the arm back. Players talk about lengthening the bridge to move the hand away from the ball and shortening it to bring the hand closer.
Hand-to-ball distance
When
The risk
Short (less than a hand)
Soft shot, ball near the cushion, maximum accuracy.
Swing too short: the arm locks up and you miscue easily.
Medium (one hand to one and a half hands, about 15 to 25 cm)
The ordinary shot. This is your starting setting.
None, as long as you stick to it from one shot to the next.
Long (more than a hand and a half)
Long, full shot with plenty of swing.
The shaft flexes and your aim gets less precise: only lengthen it if the shot demands it.
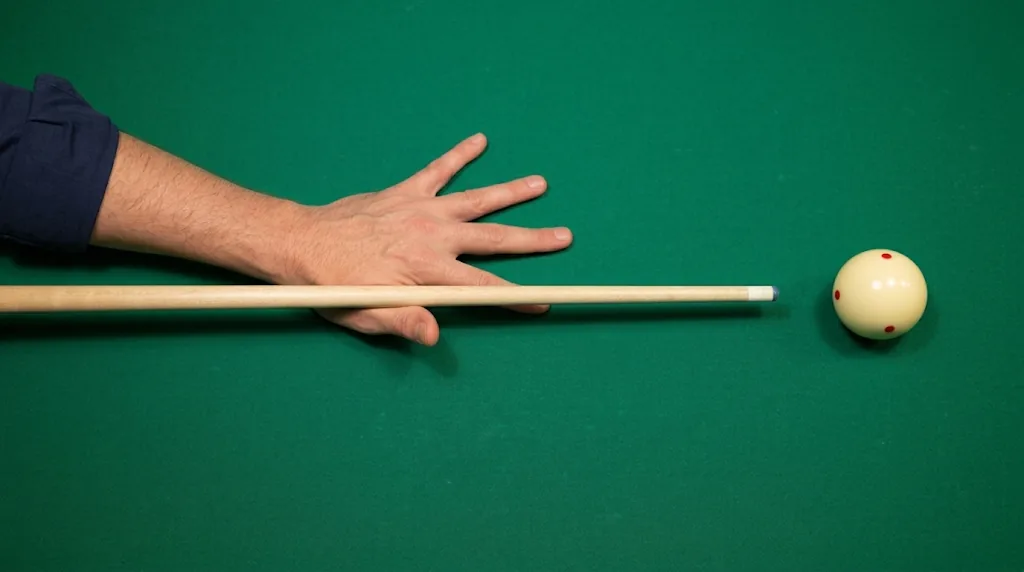
15 to 25 cm
The medium distance, seen from above: from the groove of the hand to the ball there is about a hand and a half. This is your starting setting.
These are reference points, not rules: they depend on the size of your hand and the length of your swing. The most important thing is to find the same distance again for the same type of shot.
Height: the bridge sets the hit
Your cue stays almost horizontal. What changes the spot where the tip meets the ball is the height of the guide: the higher it is, the higher the contact climbs on the ball. A few millimeters are enough: you do not need to raise the butt of the cue, which would make the tip slip and cause miscues.
Where to hit the ball
Guide
What your hand does
Draw (retro) (low) bottom of the ball
The lowest
Hand flattened, palm on the cloth; the shaft goes through the thumb-and-index ring and rests on the middle finger.
Equator (center) middle of the ball
One notch higher
The middle finger slides under the thumb and lifts the guide.
High (top) top of the ball
The highest
The hand stands up on its edge; the last three fingers support the ring.
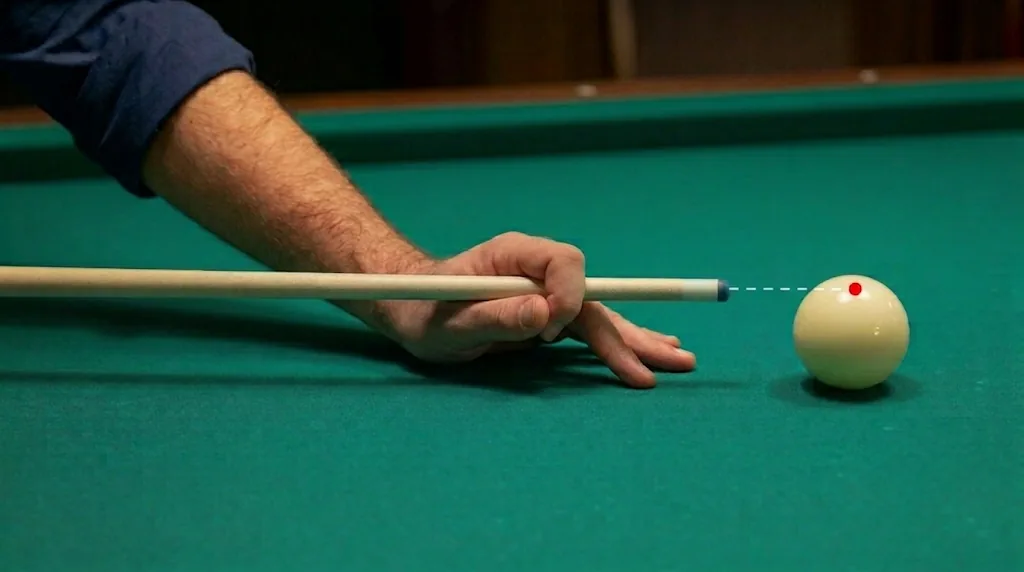
The cue ball seen from behind: the red dot is where the tip lands. For a high hit you strike the top of the ball; at the equator, the middle; for draw, the bottom. A schematic, not to scale.
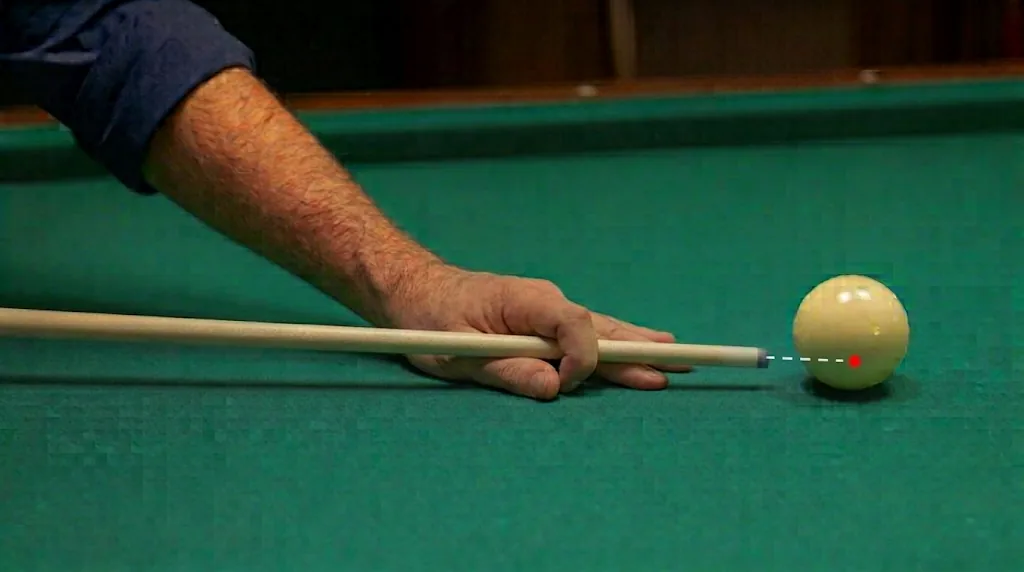
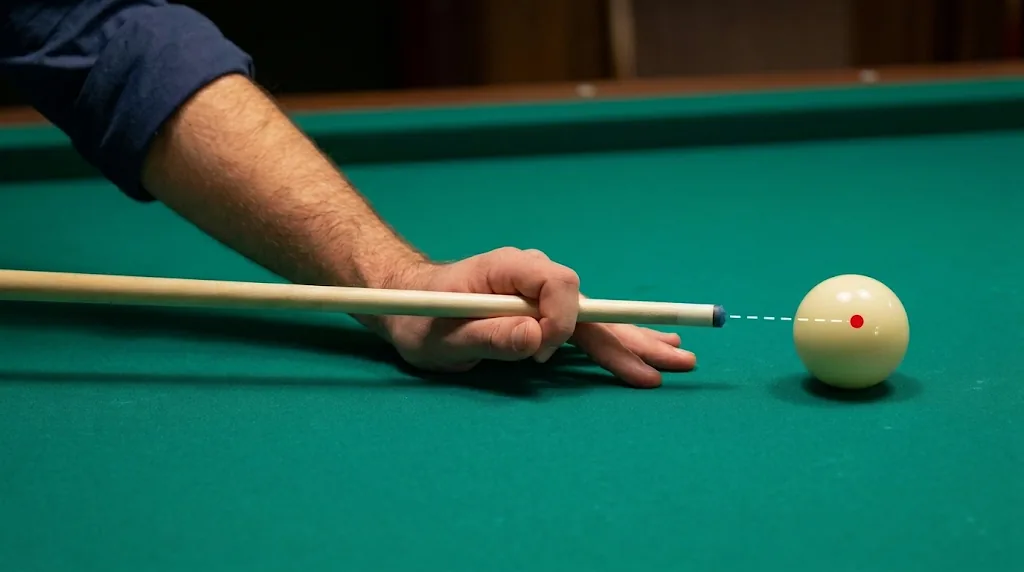
Here is what it looks like on the hand, from the side. The cue stays horizontal in all three cases; the dotted line runs from the tip to the target spot on the ball (the red dot).
Low (draw): the hand is flattened, the cue passes very close to the cloth and the tip aims at the bottom of the ball: the draw.Center: the guide is one notch higher and the tip aims at the middle of the ball: the equator.High: the hand stands up, the guide is at its highest and the tip aims at the top of the ball: the high hit.
Change height without moving the hand. The palm (or the little and ring fingers) acts as an anchor: it does not move. Only the middle finger and the position of the thumb change. If your whole hand moves to go from low to high, your bridge is no longer where you aimed: check the line again before you shoot.
Watch your view. The higher the guide goes, the closer the thumb and index come to your eye and can hide the tip. If that happens, raise your head a little, or choose a lower guide if the shot allows it. A player who can no longer see the tip ends up aiming by guesswork.
The thumb: it makes the link
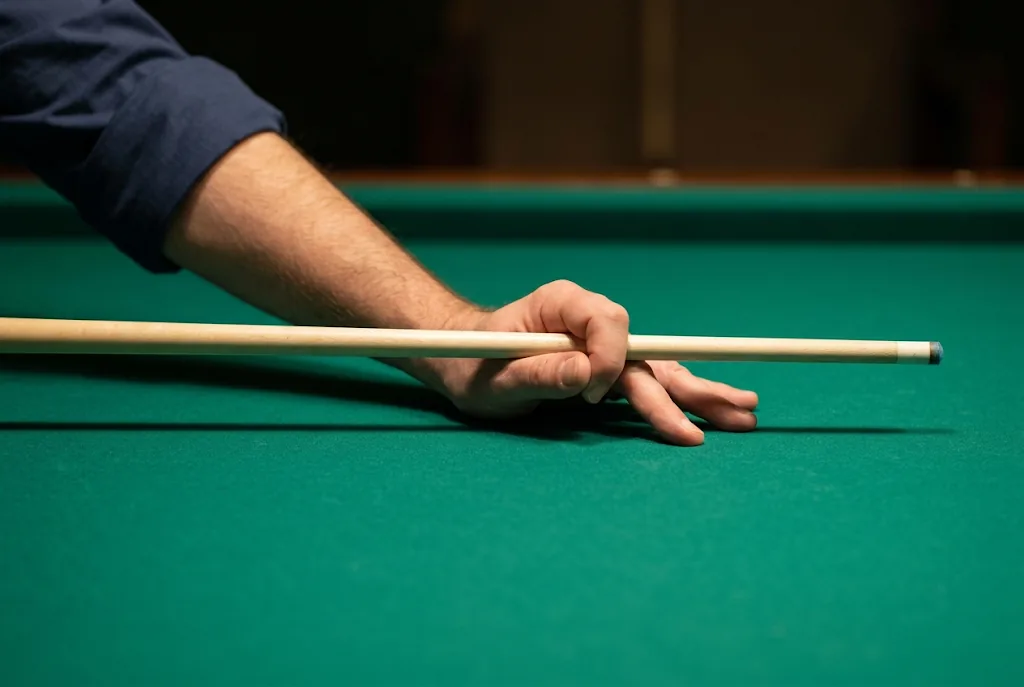
In a closed bridge, the thumb and index meet to close a ring around the shaft. The thumb makes the link: if it comes away from the index, the ring opens and the cue goes off to the side; if it squeezes, the shaft catches and the shot stiffens. Three shapes to know: the closed bridge, the open bridge and the one played on the rail.
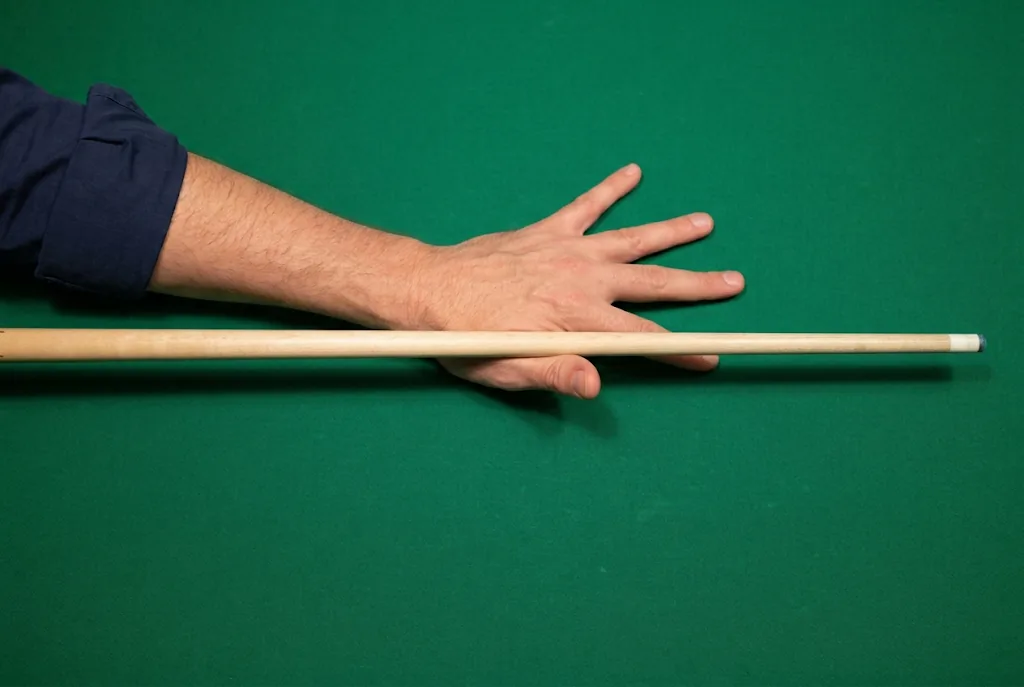
The closed bridge, seen from the side: the index wraps around the cue and the thumb comes to touch it. The other three fingers, spread out, press on the cloth.The open bridge, seen from above: the cue rests between the thumb, underneath, and the index, beside it (it does not go over the top). The other three fingers are fanned out on the cloth.
The thumb touches the index. It does not move away: this contact closes the ring and keeps the guide steady.
The ring wraps without squeezing. The shaft must be able to glide freely, even when you are not moving forward: if you have to force it to advance, you are squeezing.
The thumb stays in the plane of the hand. A thumb sticking up in the air pulls the guide upward and makes it unstable.
Open bridge for soft shots. The raised thumb forms a notch with the index where the shaft rests: simpler, but less stable, so keep it for low-speed shots.
A glove helps the glide when the hand is sweaty: see Equipment.
Playing at the edge
When ball 1 is near the cushion on your side, there is no room left to put your hand on the cloth behind it. Two solutions, depending on how much room is left.
Room behind the ball
Bridge
What changes
Your hand fits on the cloth without the cue rubbing the cushion
Normal bridge, on the cloth
Nothing, but keep the shaft short: the cushion is close.
Ball against the cushion, or so close that the hand has no room
Hand flat on the rail
You play very softly, the hit is mostly at the center or below, the stroke is short.
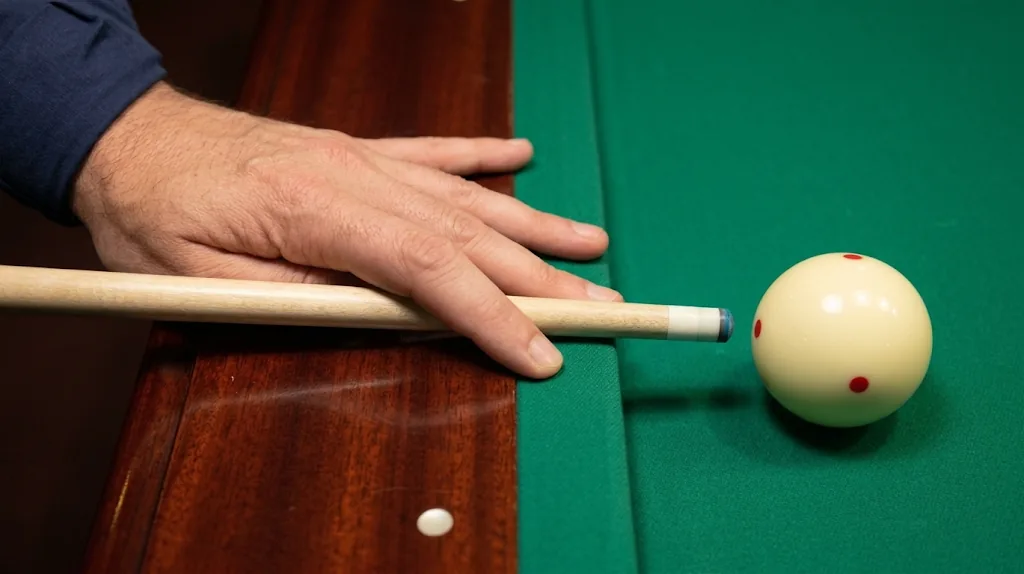
On the rail, seen from above: the ball is near the cushion on your side, and the hand has no room on the cloth. It lies flat on the rail, beside the shaft, and the index goes over the shaft to hold it.
Getting set at the edge, step by step
Choose the line standing up, as always: the cushion does not change that rule.
Move in until your hip is near the cushion, without lying on the table. Your weight stays on your feet, not on your hand.
Lay your hand flat on the rail, beside the shaft: palm well down, fingers spread, exactly as on the cloth.
Form the guide: the thumb and middle finger on that side, the index coming over from the other side, on top of the shaft. The shaft is held on three sides.
Shorten the stroke: move your rear hand forward on the cue to stay in your plane, and keep the shot short.
Check your view: the index must not hide the tip from you. If it does, raise your head a little.
What the edge changes in the shot
The power is low. From the rail you play gently: the swing is short, and the bridge has no room to be far away.
The hit is mostly at the center. A guide resting on the rail does not always allow a high hit: and it is not necessary, a center hit is usually enough.
The cue slopes down a little. The hand is higher than on the cloth: that is normal, but do not try to strike downward, that is another shot (the piqué).
The margin for error is thinner. Take your time, especially on the fullness of contact.
When the ball is too far away to be played without leaning dangerously, an extension (see Equipment) saves you from climbing onto the table.
Common mistakes
The bridge that moves. The hand slides or lifts at the moment of the shot: the shaft goes off to the side.
Squeezing the shaft. The ring becomes a vise: the cue catches and the stroke stiffens.
Too much play. The ring is too loose: the shaft wobbles and the line drifts.
A thumb that comes away from the index. The ring is no longer closed: the cue goes off to the side.
Raising the butt. To get a high hit, you raise the guide, not the cue.
A guide that hides the tip. You aim without seeing: raise your head or lower the guide.
A bridge “in the air,” with no support on the cloth or the rail: rarely stable.
Changing bridge at the last second. The line chosen standing up is no longer the right one: check again.
Six exercises for the bridge
Do them in order. The criteria are suggestions: adjust them to your level, but keep the same shot and the same speed from one series to the next.
1. The empty glide
Goal: feel whether your ring squeezes or wobbles.
How: without a ball, take ten practice strokes with the cue in your bridge, slowly, then a little faster.
Criterion: the shaft glides without catching or wobbling, and your hand stays in place.
2. Staying still
Goal: check that the hand does not move during the shot.
How: play ten soft shots at the same speed. Watch your hand from the side, or have yourself filmed.
Criterion: not once does the little finger or the palm lift or slide.
3. Three heights
Goal: link the height of the guide to the hit.
How: place ball 1 at a medium distance, with no ball 3. Play three shots with a low guide, three at the center, three high, at a firm speed. Watch the spin of the ball after contact.
Criterion: the difference in behavior shows at each height and repeats from one shot to the next.
4. Three distances
Goal: find the distance that gives you the most accuracy without costing you swing.
How: same shot, three hand-to-ball distances: short, medium, long. Five shots each.
Criterion: note the distance where you are most consistent: that is your starting setting.
5. The tight thumb, the loose thumb
Goal: feel what the thumb does.
How: play five shots with the thumb against the index, five with the thumb deliberately spread away, five with the thumb squeezed too hard.
Criterion: you identify the moment the cue drifts or catches.
6. Along the cushion
Goal: get used to playing at the edge.
How: place ball 1 a hand away from the cushion, then a ball away, then against it. Play five soft shots from each, with ball 2 facing you.
Criterion: four shots out of five hit ball 2 where you aimed, without a miscue.
Key points
The bridge guides the shaft, sets the height of the hit and must stay still.
The hand sits about one hand to one and a half hands from the ball: further for a long shot, closer for a soft shot.
The cue stays horizontal: you raise or lower the guide, not the butt.
The thumb makes the link with the index: it does not squeeze, it does not move away.
At the edge, the hand goes flat on the rail: thumb and middle finger on one side, index over the top, soft shot.
Before you shoot, do the glide test; after the shot, check that you stayed still.
⚠️ These reference points (distance, thumb shape, guide height) are starting points: they depend on the size of your hand, your swing, your cue and the table. Have an experienced player or a club coach confirm them before making them a habit.